Back in 2003, I joined the team that was venturing into the world of server virtualization, and little did I know that it would take me on journey, that remains as exciting today as it was back then. This was the time, when leaders in our team were contemplating building a brand new hypervisor based virtualization solution. Who knew, back then, that one day it would become the defining feature of our server and cloud solutions. I remember, new to the team, wondering what role I would play in this product, which sounded like rocket science at that time. There were intense architectural meetings, long discussions on finding a code name for the project and both excitement and nervousness to see what I would get to do. Eventually Viridian was born and I, along with one of my colleague Jeffrey, was given the charter to build network device virtualization for Viridian.
The goal was simple (well it sounded simple), build a compliant, best in class, high performance network device virtualization. It was my first project to build something in kernel mode, it was exciting, and challenging. We spent countless hours on the whiteboard debating how the overall solution should look like, what should each component do, what would be the right layering, right modules and all those fun parts of the project. And this is what we built eventually.

First and foremost, we decided that we would build a switch that is 802.1Q compliant and behaves like a physical switch so that the VMs (or child partitions) running on Hyper-V would have exactly same network semantics as a physical machine. This makes sure that virtualization doesn’t create a bar to adoption and what works in physical environment, would work in a virtual environment. This is the component VMSWITCH shown above. I will talk more about it in a future post.
Next thing we decided was to create two separate device types, one that emulated a real hardware, in our case Intel DEC 21140A, shown as “Legacy NIC” above and other than ran over a virtual bus (VMBUS), shown as “Virtual NIC” above. Legacy NIC was to provide compatibility with existing operating systems since most of them had a device driver for it already, whereas Virtual NIC was to provide high speed networking for “enlightened” operating systems for which we decided to build our virtual bus.
Legacy NIC is built using device emulation, such that to the operating system running in the VM, it seems like a real physical device and accessed via the bus and device registers. The access to these registers is intercepted by the hypervisor, that are then redirected to a user mode process VMWP in the root partition, which carries over the emulation. It then sends the network packet to VMSWITCH, which does the forwarding. Similarly, when VMSWITCH receives a packet destined for the legacy NIC, it is given to VMWP, which indicates it to the child partition by issuing an interrupt via the legacy NIC device emulation. This, is a slow process due to multiple context switches between, child partition, hypervisor and root partition. However this allows networking to work on “unenlightend” or legacy operating system on Hyper-V.
Virtual NIC is built over the virtual bus and is virtualization aware. Being virtualization aware, it doesn’t go through traditional device access mechanisms and uses shared memory to transfer data between child partition and root partition. Virtual NIC makes it easier to provide various NIC offloads to the child partition and since we don’t have to fiddle around with emulating device registers for every new offload, we can enable new offloads easily. I would talk about, how some of the offloads work on Hyper-V in a future post.
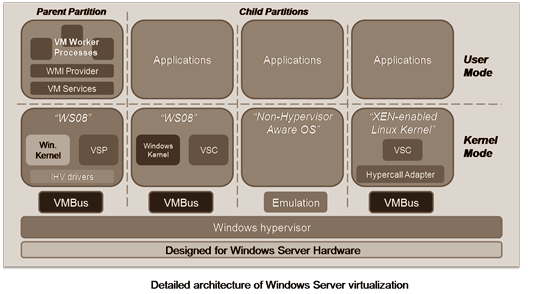
The picture below (courtesy: http://msdn.microsoft.com/en-us/library/dd722833(v=bts.10).aspx) does a good job in showing the difference between enlightened and unenlightend operating system on Hyper-V.
So this is how network device virtualization works from a 1000 ft level on Hyper-V. In future post, I would go in the details of how VMSWITCH works, how offload support and various other features work. My plan is to finish the basic device virtualization series and then switch to network virtualization and SDN, and describe the internals of some of the cool stuff we are doing in Hyper-V.
Thanks for reading, I hope you find it useful. Please feel free to let me know if you would like me to talk about a particular area or specific topic.
This posting is provided “AS IS” with no warranties and confers no rights.